¶ Getting Started
 |
 |
- A Widget is simply the web content which collects cardholder data.
- You can collect an instant payment, collect the cardholder data for a future payment, or both.
- Collecting cardholder data for future payments is called Card On File.
- Once Cardholder data is saved in our system, you can use our API to pass a token and authorize a payment.
- After the widget has been submitted, we will pass relevant data to you as a webhook.
¶ Designing Your Widget
You have as much control as you want when it comes to collecting Cardholder data. This includes the design of the content, the size of the content, and the way data is populated and consumed. We can also simplify the workflow with a standard widget if that is what is required. Here are a few considerations when designing a widget:
¶ Widget Design Considerations and Options
- Public Facing or Practice Facing
- Collect Cardholder Info or Instant Sale or Both
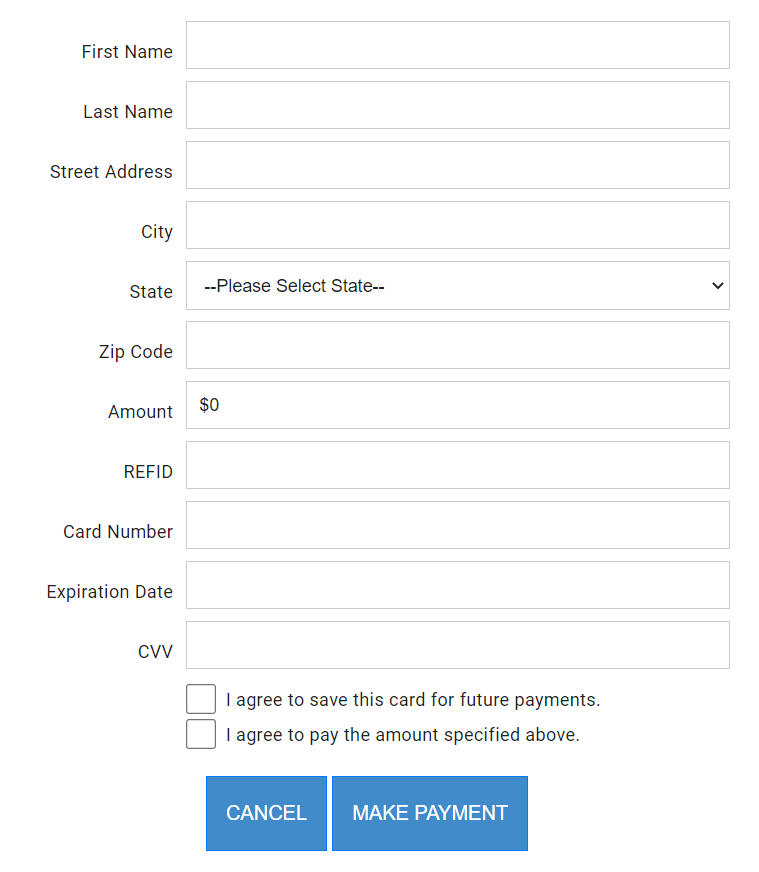
- Decide on visible fields to show ( Cardholder info and/or Patient info and or ReferenceID or PatientID )
- Decide on Background (non-visible fields) ( ReferenceID sometimes passed in the background )
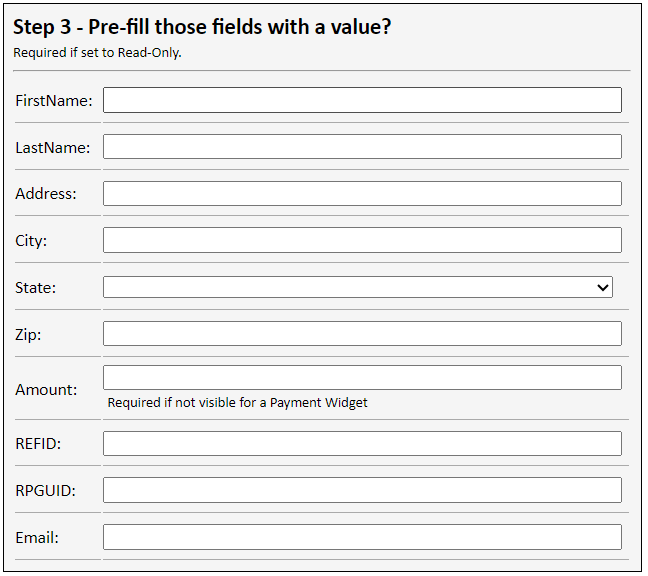
- Decide which fields may be Pre-populated ( Firstname , Lastname , etc )
- Decide which fields may be altered by the end-user (Can they change their address or the amount?)
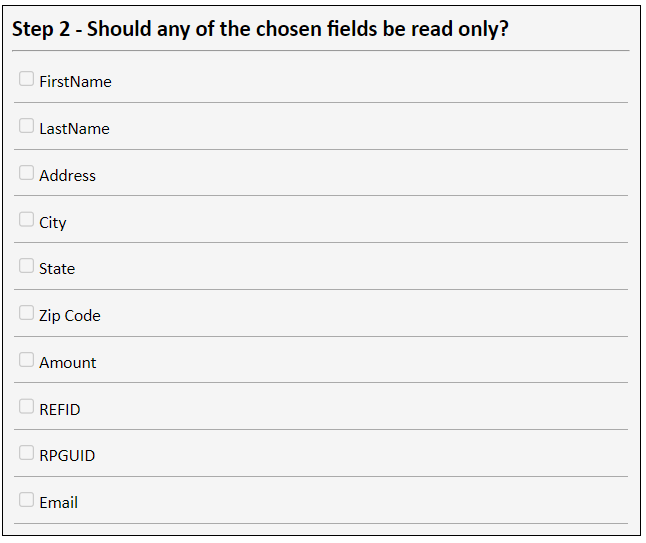
- Decide which Fields may be READONLY
-
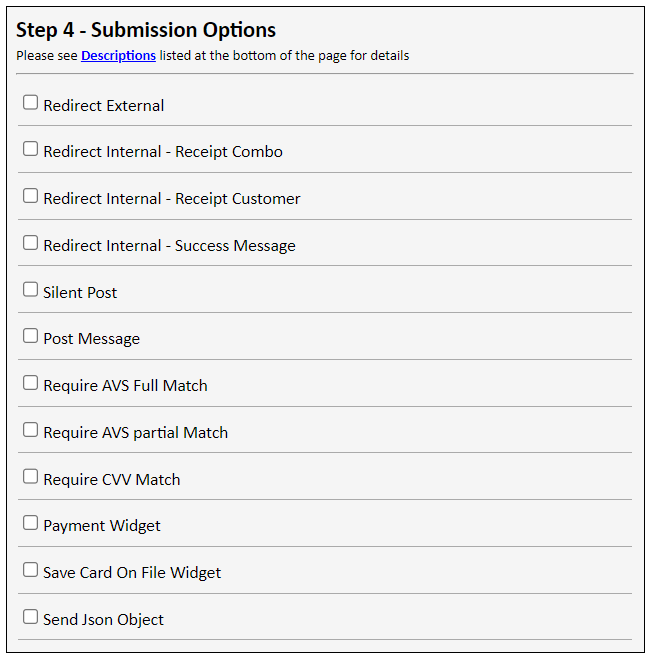
Decide how to POST (real-time) values from the submitted widget:
- Widget shall redirect to the integrator site with encrypted values attached
- Widget shall be contained in an IFrame and simply do a POST MESSAGE to the parent page
- Widget shall POST values to an integrator site without the redirection (background Posting)
- Decide whether we need to redirect to an Easy Pay receipt page (or a consent agreement page)
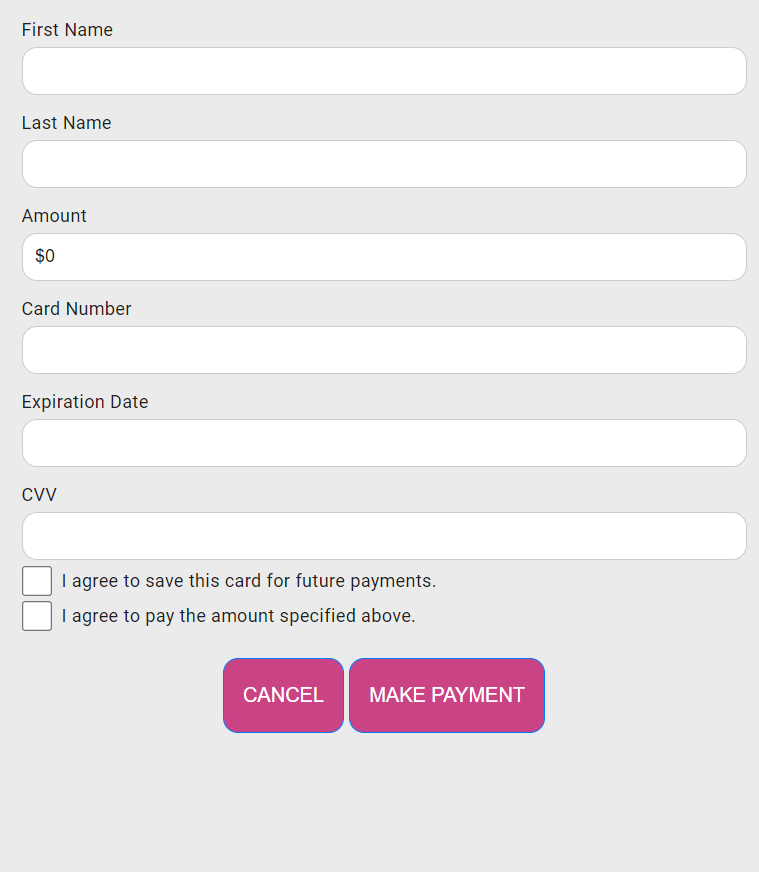
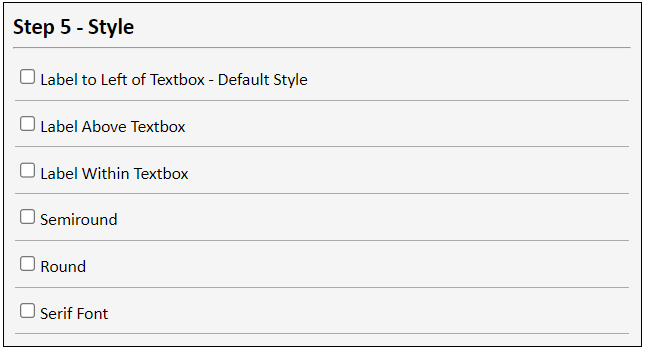
- Decide on visible characteristics such as: size, colors, Frameable, absolute sizing or deterministic sizing
With any widget you will need to know how you plan to use it in your workflow. Here are a few popular usages for widgets:
- Embed the widget directly within your desktop or Web Application
- Direct your users to a dedicated top level payment page
- Send the generated payment link directly to card holders
¶ IFrame vs Full Page
¶ What is an IFRAME?
An IFrame is a web container which can contain content from any domain. Over the last decade this has been an ideal method for our integrators to include a payment widget since it has become an integral part of their web site. It creates an environment where the payment window becomes a part of the client site.
Loading an IFrame with an EasyPay Payment Widget or PayForm gives you 100% isolation from Cardholder data. This provides excellent security and eliminates more costly PCI compliance programs.
Currently we have two types of Payment Collection Offerings
- PayForm (New)
- Widget (Legacy)
PayForm does not utilize a session cookie so there are no issues with loading an IFrame with EasyPay content.
Our Legacy payment Widget does require a Session Cookie and therefore extra steps are required to utilize the IFRAME approach. Safari will block cookies from IFRAME if the parent page does not share the same domain. To resolve this a subdomain can be created and served on our web farm.
Either type can also be designed to open as a top-level page or in a mobile browser rather than an IFRAME.
¶ Full Page
If you do not want to use an IFrame to host our payment widget, we can also develop a full-page payment display. You will open this page exactly the same as any widget (you may pre-populate some values as the page is opened). Once the User submits the payment, we can POST real-time data to your site in a number of ways. Usually, we will simply redirect back to your site with some ECHO values which allow your application to pick up where it left off prior to payment.
We encourage integrators to design their own payment page if they so desire. You can supply independent HTML/CSS/Javascript/JQuery for us to include and modify in our secure PCI Level One environment.
¶ Creating Your Widget
To open your widget you first need to create a string manifest that eventually becomes an encrypted URL. There are multiple ways to create this manifest: using our widget builder tool or creating it yourself using your programming language of choice. If you want to use advanced options such as prepopulating form data you will need to program the widget manifest without the tool.
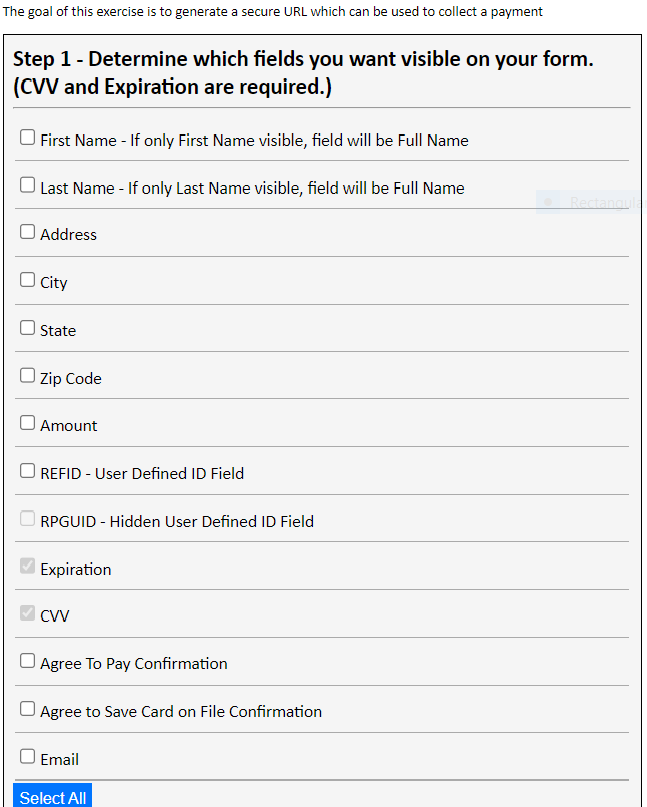
¶ Using the Widget Builder Tool
Use our widget builder tool to select various settings, options, and styles. The widget manifest and encrypted URL is generated for you.
In addition to the screen shots below, you can try the online widget builder tool.

¶ Programming the Widget
Note: If you need to open the widget with dynamic content you will need to do some programming. This is also true if you need to consume real-time data after the widget is submitted. If you simply need a widget for users to submit payments and need no dynamic content or real-time postings then we can simply provide you an encrypted URL to place in your product.
NOTE: Please ONLY USE the Account Code and Token that was provided for your account.
Do not use the Example Account Code and Token listed below.
In order to open an EasyPay Solutions widget for collecting credit card information, first you must create a WIDGET MANIFEST. This is simply a string which is has two components.
?Key=Here you need to enter your Easy Pay credentials. You can either use your Account Code and Token OR a Session Key.
&inputs=Here you add parameters which can pre-populate the widget with values as well as direct us where to post the results
Example of authenticating using an Account Code and Token
?Key=EP2944916|0EDED2AE63D748079FBCFEB552A93A16
Example of authenticating using a Session Key (preferred)
?Key=AABAF6C95552447D8B303031353341303032303634
¶ Input Parameters
Example of Input Parameters
&inputs=MERCHID|2|WTYPE|P|REFID|1234|RPGUID|5678|FIRSTNAME|John|LASTNAME|Doe|ADDRESS1|123 Fake St|ADDRESS2|Apt 2|CITY|Scarborough|STATE|ME|ZIP|04074|AMOUNT|16.75|REDIRECT|https://easypay7.com/PostingApp
MERCHID: Here you will provide an integer which represents one of your merchant records. Easy Pay accounts can have one or more merchant records (or merchant locations) which they can direct funds too. You will get this info from Easy Pay when you board a new account.
REFID: Here you can send any unique identifier to describe this particular cardholder or transaction which we will store in our database. You can then query our database at a later time to find these records based on this reference ID.
FIRSTNAME: (optional)
LASTNAME: (optional)
ADDRESS1: (optional)
ADDRESS2: (optional)
CITY: (optional)
STATE: (optional)
ZIP: (optional)
AMOUNT: Depending on which type of widget this is (One-Time Payment or Consent) this may be appropriate.
WTYPE: This is a required field which tells us which widget to open. Easy Pay will provide this information. For testing, you may use P
REDIRECT: You can specify a URL where we can POST the results of the widget submission. If you are storing a card-on-file we will provide information such as a CONSENTID which will allow you to charge this card at a later time. If you are simply collecting a payment, we will provide the TRANSACTIONID so that you may later do operations such as CREDIT / VOID etc.
¶ Encryption
Once you have developed your string manifest you will now need to ENCRYPT this string using AES 256. You will be issued a Unique Encryption Key when you begin to process Live transactions but until then you are encouraged to use the Easy Pay Development Sandbox Key
- AES 256
Sandbox Key:
A142278ED69B3FE6C5E8F63CB8205F519F3A82BEA9CB2719938DB88D5C35EC60
Whenever you use this key, you will append the following to your encrypted URL so that we know which Encryption key you will be using
EINDEX=300 (this index will change when you get your LIVE key)
In all cases you will encrypt the above manifest and create two components. An initialization vector (I) and an encrypted message (M).
Now we can gather the widget manifest as follows and encrypt it to create 2 components ( M & I )
?Key=EP2944916|0EDED2AE63D748079FBCFEB552A93A16&inputs=MERCHID|2|WTYPE|PN|REFID|1234|RPGUID|5678|FIRSTNAME|John|LASTNAME|Doe|ADDRESS1|123 Fake St|ADDRESS2|Apt 2|CITY|Scarborough|STATE|ME|ZIP|04074|AMOUNT|16.75|REDIRECT|https://easypay7.com/PostingApp
The final step is to create a URL as such:
“https://" + assigned easypay URL + "/?m=” + encrypted + “&i=” + IV + “&Eindex=300”;
Your final Widget URL is shown below:
https://easypay5.com/stdwidget/?m=wphl1A6AdqOSqIdKFOSn88QavjhU9YwpCGrJlcoleDGtWrXeoDUcFXK2tlYD8sfhr0pXZbcBBQaS0fmZXNSG9MbxcveD4WqauFKL3d/ev7SlmfxDshPQhLhkGN9aHYQKby+7iWaSu4UfNmGd/53Ot275LsJ1AA/MaB+u5h7xRbY2+Oa5o0Dq3C7PDcH+pnpYQxgDKOiDERCBCdVHXdi9tfk9AqbhbAnXXr0PIAVfjIWA/Q7kDBLK2MooQNPyNw6h+QVQFJFNrfb4hbRp8VYJVOOLFO3hB/Fj1+jrSSeteORJw1LuUK2ekJUB15enIC6CyDtsU9NkAex9FT7O6GhDxN77PDdYhxpkwMI9KiiLUCffVtS2KQdHO9g7Uo56+z3lAFRzn6gX7mcvjAmnGiNa+kydZkWx9KKSWRHORGKl1IydupV0B7wJRFRbikDoxINbhCg2GCD5W8+pOc8KxctCjw==&i=Uw/DOxrBSY4X1alDyxpB0A==&Eindex=300
Notice at the end we have appended “EINDEX=300”. This value tells us that you want to use a specific encryption key (Our sandbox development key). Once you have finalized all your development, we will tell you which number to use for LIVE transactions. When you use the EINDEX=300, you are telling Easy Pay that you have sent us an AES 256 encrypted message with a specific key. This key=A142278ED69B3FE6C5E8F63CB8205F519F3A82BEA9CB2719938DB88D5C35EC60.
There is an encryption utility which you can use to test your work HERE:
¶ Getting Real-Time Data from the Web Widget
Currently there are a few methods which we can use to POST data to your product when the Widget is submitted:
- Provide a REDIRECT URL in the string manifest where we can hit your page with an encrypted message
- Provide a URL where we can POST a value (PHP, ASP.NET)
- If you show our widget in an IFRAME we can optionally do a POSTMESSAGE to the parent page
If you provided a REDIRECT URL, we will POST data to your site as follows: https://yoursite.com/yourpage.aspx?m=xxxxx&i=xxxxxx
You will read the m and i values and decrypt using the same encryption scheme, and key that you used to open the widget. Please replace any SPACE characters with + characters prior to base 64 Decryption, since these can be altered during URL encoding. Here is some typical decrypted data:
CONSENTID|1664|CARDNO|5439|CARDTYPE|Visa|FIRSTNAME|Bob|LASTNAME|smith|REFID|324889
TRANSACTIONID|174|CARDNO|5339|CARDTYPE|Amex|FIRSTNAME|Bob|LASTNAME|smith|REFID|7899
¶ Using our APIs for Additional Processing
Now that the cardholder data is on our system you can use our APIs for additional processing, such as charging consents, crediting payments, voiding transactions, and running reports.
The API also includes functionality for creating tiny URLs that are more suitable for sending via text or email. Review the Text to Pay documentation for more details.
Review the REST API documentation for more information.